How to design tattoos with Procreate?
All the tips and tricks to make a digital design
06 May 2024
As we mentioned in the article Best tattoo design applications, there is a good deal of software very useful for this type of work.
However, if you're here, it's because you know that Procreate is one of the most popular programs.
To help you address some issues, we'll outline the key features of this application so you can easily master it.
Anyway, let’s see…
Why is Procreate the most used application in tattoos?
The use of iPads is very common for various reasons, one of which is the ability to have a mini-laptop in your studio without requiring a computer.
Due to this, many tattoo artists began experimenting with iOS design programs, with Procreate being one of the most sought-after applications.
As we mentioned earlier, both software and hardware are interdependent, and in certain aspects, one cannot be considered without the other.
Although Procreate was initially designed for digital illustrators and graphic designers, it has gained popularity in other fields, including tattooing, due to its ease of use and user-friendly interface.
Previously, tattoo artists had to design everything manually using paper, which was time-consuming and required many materials. However, the introduction of digital tools has significantly accelerated this process.
Consequently, it is now commonplace for tattoo artists to rely almost exclusively on digital methods when designing stencils, reducing the use of traditional methods.
Some main features of the program
1. Allows you to work in layers.
As in Photoshop, in this application, you can also work from layers (layers).
This enables you to work on specific parts of the design without jeopardizing the overall outcome. For instance, you can create a sketch on one layer and refine the final details on another.
By doing so, you can keep each layer distinct and ensure that when you remove a stroke, you do not inadvertently delete the entire artwork, thereby avoiding the need to restart from scratch.
2. Great handling of brushes and textures.
Procreate offers a diverse range of brushes and allows for experimentation with various textures.
With over 200 different types of brushes available, many graphic artists consider this to be one of the application's key strengths. However, the ability to customize these brushes to your preferences is what sets Procreate apart.
By accessing the Brush Studio option, you can personalize your brushes and even modify the included textures, or incorporate your own.
Moreover, for those who have previously used Photoshop, Procreate offers the option to import Adobe brushes and use them within the application.
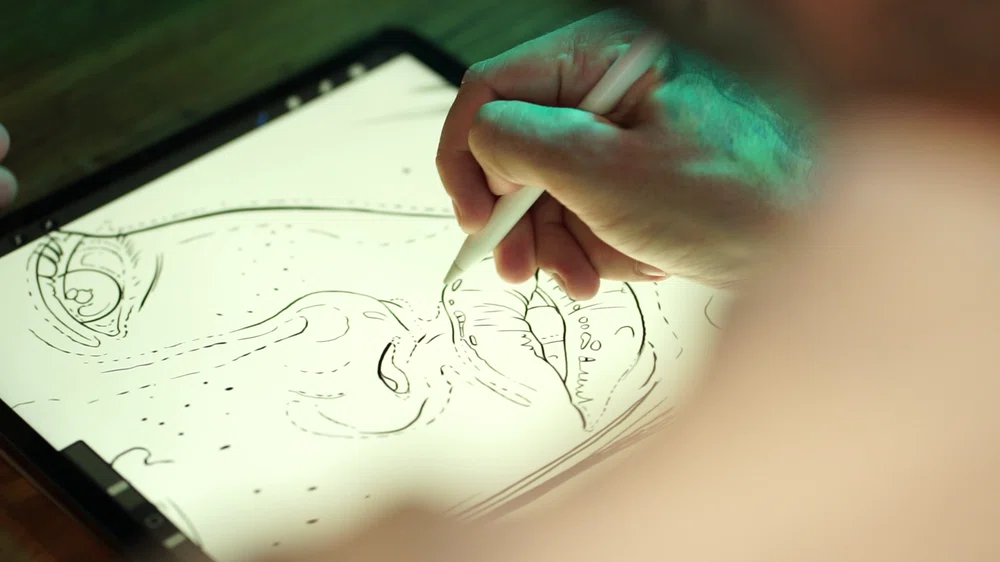
3. Automate the strokes.
If the strokes are too clean, the application improves them.
For example, if you struggle to draw a perfect circle freehand, Procreate has an intuitive feature that automatically corrects your strokes. By holding the pencil on the screen for a few seconds without lifting it, the program will correct the shape, leaving it looking flawless.
This feature applies to all types of strokes, ensuring precision throughout your artwork. Furthermore, for those who prefer symmetrical designs, there is an option to draw in mirror mode. This allows you to draw on one side, while the program copies the same image onto the other side. This is particularly useful for those who create geometric or mandala tattoos, for instance.
4. It is very good for lettering.
The program offers an option called “StreamLine” that stabilizes the strokes when making letters.
When using a pencil tool, Procreate offers the option to soften the lines, enhancing their overall appearance. Additionally, there is a text tool that enables you to write using the fonts available in iOS.
Are there any downsides to using Procreate for tattoo design?
While the software itself is regarded as one of the best for this purpose, the hardware requirements may present some drawbacks.
As an iOS-exclusive programme, users may encounter some of the downsides that are commonly associated with Apple devices.
Although they offer impressive performance, they can also have some downsides and may not be the most cost-effective option in the long run.
When using Procreate for tattoo design, an iPad is required, but it doesn't come with the essential drawing tool, the Apple Pencil. This means that in addition to purchasing the tablet, users will also need to consider the additional expense of the pencil, which can be a significant burden.
Regrettably, it appears that the company is not interested in including these essential elements, and as a result, some other brands are offering alternative products that could become strong competitors for Apple.
If you want to know more, read our post Is the iPad the best tablet for designing tattoos? Where we give you some alternatives for both hardware and software.
Now, let's proceed with our analysis of Procreate.
Designing tattoos with Procreate from scratch
As previously mentioned, Procreate is designed for use by illustrators, offering a variety of digital drawing tools.
The program allows you to create tattoo designs without needing paper or traditional materials. To begin, open the program and click on the “+” symbol in the upper right-hand corner to start a new workspace.
From there, you can select the canvas size. We recommend using letter size (21.59 x 27.94 centimetres). Choose your preferred brushes and colors, and begin designing.
Always remember to work in layers to keep your work organized and avoid accidentally deleting your progress and having to start over.
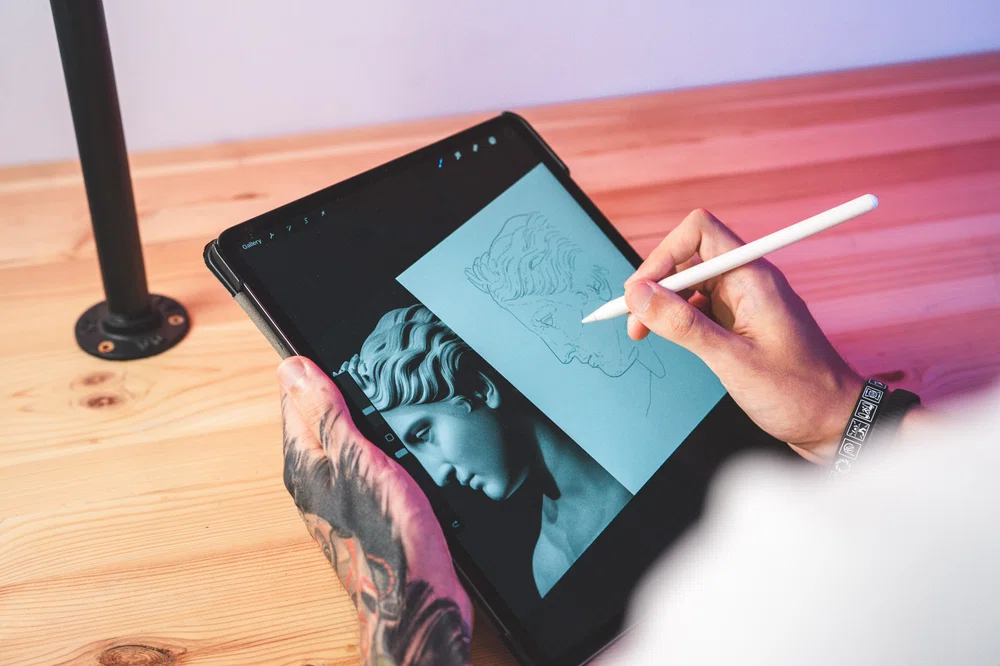
Create a stencil from a photo or realistic image
Procreate offers the possibility to import a photograph and use it to generate a template.
After adding the image or images to the program, make sure that each one is kept on a separate layer. Arrange them as desired, and once you are ready, reduce the saturation to zero. This will give you a black-and-white image that is much easier to work with.
Next, create a new layer and use it to draw the strokes that will form your final stencil. We recommend making these initial strokes in a bold colour like red to avoid confusion.
When you have finished drawing all the lines, turn off the original images and create a new layer and redraw all the lines with a different colour. This allows you to correct mistakes and ensure the final work is flawless. Once completed, you can delete any unnecessary layers and keep only the last one.
If you are experienced, you can skip this step and work directly with the red lines layer. Once finished, turn off the original image and reduce the saturation to zero. This will change the red lines to black, and your stencil will be complete.
Remember that these tips are based on our experience. The important thing is that you practice and develop your own way of doing things.
If you're interested in learning more about digital realistic design, we can teach you everything you need to know about Realism in a practical way.
With the guidance of Coreh Lopez, a skilled black and grey realism tattoo artist, we can provide you with tips and advice to help you achieve better results and take your skills to the next level. Click here to Learn how to tattoo like a Professional.
Other uses of Procreate
But in addition to all of this, you can also visualize how the tattoos would look on your client's body.
To do this, the first step is to take a photo of the area of the body where you want to place the tattoo and then import it into Procreate.
From there, you can position the tattoo design wherever you want on the photo and check the size, color, and other details. This way, both you and your client can see if any adjustments or touch-ups need to be made before starting the tattooing process.
What about you, do you use Procreate or prefer another application for designing your tattoos?
If you want to learn new tricks for designing in digital applications and make your work easier, within our MasterCourse: Realistic Tattooing, Coreh López reveals how to get the most out of them.